This document will guide you through the new features and benefits of the updated Payday Advance website. If upon reading this guide you still have questions, please do not hesitate to contact us on 0800 227 484 or via the chat facility in the bottom right corner of this page.
Your personal account
 Setting/resetting your password
Supporting documentation guide
Taking screenshots on your phone or tablet
Your personal account
With the enhanced website, applying for a subsequent loan and receiving updates on your applications is easier and so much more straight-forward.
Setting/resetting your password
When you next use the Payday Advance website, you will need to set your password. It’s very easy – simply follow the instructions below:
1. Go to the Login section – this is what you will see from now on – and click on the link under the “Set or Change Password” heading:

2. You will see the following screen. Please enter the email address you used to register with Payday Advance. A unique TXT Authentication code will be sent to your mobile phone number that we have on file for you (please contact us if you think it needs to be updated):

3. Please enter the TXT code and the new password and click “Submit”. For protection of your online account and to prevent unauthorised access, you need to keep your password safe and treat it as you would treat your personal banking password:

5. All done! Now your new personal account is all set up and ready to go. Please click “Click here to continue” to log in:

Please enter your email address and the password you have just set up, to log in:

When you log in, you will see the home screen (My Account) of your personal online account.

Now you can:
– Check the real-time status of your current loan application;
– Check the amount you are currently eligible for and the balance of any existing loan;
– Apply for a subsequent loan;
– Request to update your personal details;
– Change your password;
– Check your messages;
– Upload documents.
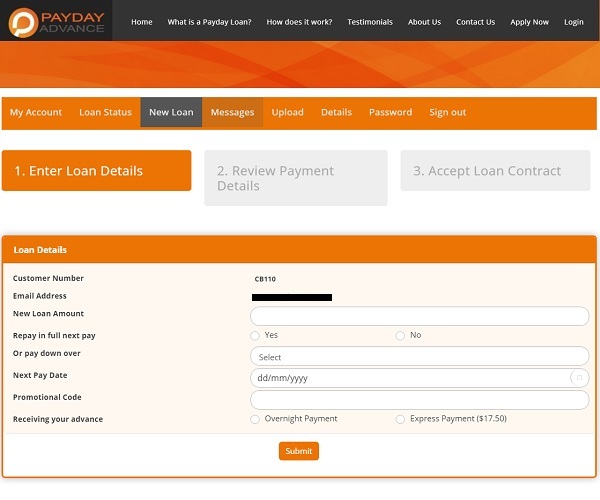
If you don’t have a loan in process, you will see this screen in the New Loan tab. Here, you can apply for a renewal loan.
1. Simply enter the loan amount, number of repayments, next pay date, promotional code if you have it, and overnight or express payment and submit:
2. Review payment details: check the repayment amount(s) and date(s). Review your personal details. Select the purpose of your loan from the drop down and complete the loan affordability check. All fees and charges will be clearly stated. Click “Continue” to proceed with your application; or “Change” to change the loan amount and/or number of repayments:


3. Electronically accept your contract by entering the Contract Code that you will find in the top right corner of your Loan Contract. Enter it in the field, tick the tickbox and accept the Contract. Great – you have submitted your application!

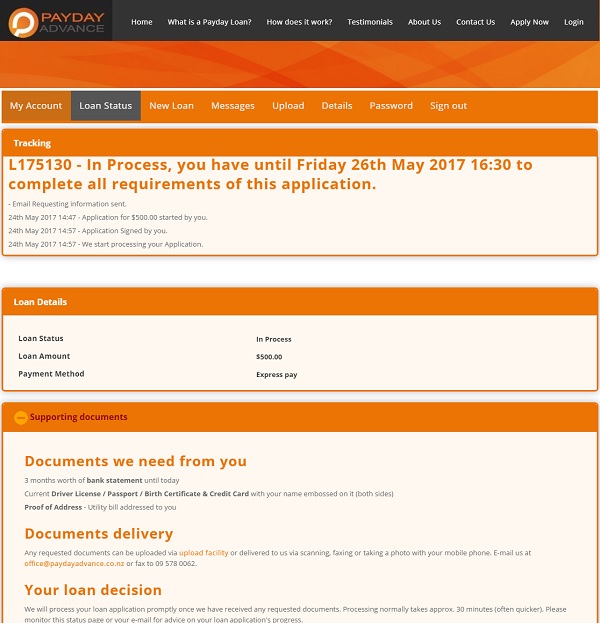
Once you have applied for a loan, you can track the status of your current application in the “Loan Status” tab:
Here you can see the details we have for you on file. If any of your personal or employment details need to be changed, you can send us a request. Simply click on the “Details” tab and scroll down the page until you see the button ‘Request to update information’. (Please note if you are wanting to update employment details we will require bank statements showing your last two pays.)

If you need to change your password for any reason, head over to the “Password” tab:

If you need to check your messages, head over to the “Messages” tab:

If you need to upload any documents, head over to the “Upload” tab:

Supporting documentation guide
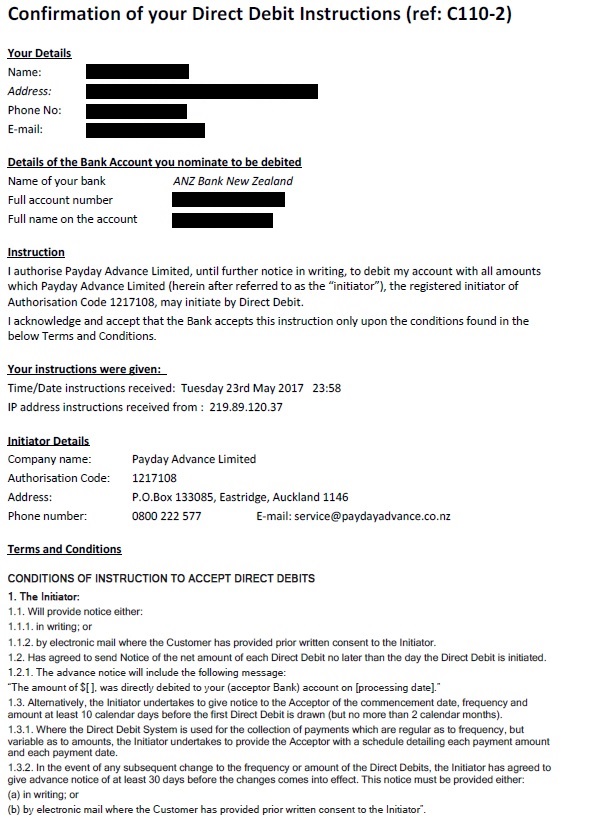
You will receive the Direct Debit form by email once you submit your application online. You would have digitally signed this during the application so there is nothing further you need to do.

We require statements for the latest 90-180 days up to today’s date. For example, if today is the 25th of June 2019, we will need them from the 25th of January 2019 until today.
You will be required to complete the bank verification on the application form.
We DO accept online bank verification, or PDF bank statements, screenshots, clear photos and scanned paper statements for returning clients.
Bank statements should clearly show the bank’s name, your name, the account number, all deposits and withdrawals, descriptions and amounts for all transactions (with nothing edited or removed):

Please note that we CANNOT accept transaction summaries without descriptions or bank statements in Excel, CSV, Word or any other editable format.
To complete the bank verification online please login to your account with us and select the loan status tab. Please select your bank and proceed as instructed;

Your ID must be current and valid; all details on it must be clearly visible once we receive it, and you must not erase or edit any details on your ID.
Pictures below are examples of acceptable proof of identification (we only need one):
1. New Zealand Drivers License – Please provide us with a copy of your NZ Drivers Licence, please ensure you include the expiry:

OR
2. New Zealand Passport – Please provide us with a copy of your New Zealand Passport:

OR
3. International Passport – We accept valid International Passports however you will have to provide us with a copy of the main page, a copy of your valid Visa, as well as a selfie of you holding your passport (please ensure your passport details in your selfie are legible);


OR
4. New Zealand 18+ card – We will need a copy of your 18+ card, your New Zealand birth certificate, as well as a selfie of you holding your 18+ card (please ensure your 18+ card details in your selfie are legible).

of address must be dated within the last 3 months (if you apply on 05/04, your address validation document should not be older than 05/01). This must be the address you have provided on your application. It has to clearly show your name, physical address and date.
Please note that if your address is on your bank statements, you will not need to send us a third party letter!
We will accept the following documents as your proof of address:
– Any letter from your bank or a financial institution addressed to you.
– A letter from a government agency (IRD, MOJ, MSD, NZTA, Police etc.) addressed to you.
If you are looking to consolidate any of your other short-term loans (with lenders other than us), you will need to send in a full statement of account (with settlement amount) for each of those loans.
This full statement will need to be generated by the lender it is owned by and contain the full and current outstanding amount owed/settlement amount. It will need to show the full term/period of the loan up to the date of your request for a consolidation loan with us.
Once you have the supporting documents, you can either;
– Scan and email the files to hello@maranello.nz; OR
– Upload them on the website; OR
– Take clear photos and email them to hello@maranello.nz – please see the instructions below.
Taking screenshots on your phone or tablet
There are a few ways of sending your supporting documentation to us – one of them is taking screenshots and emailing them to us.
1. To take a screenshot of your bank statements or any other documentation, simply press the HOME (the button you use to go back to the homescreen – right in the middle) and SLEEP (top right corner) buttons at the same time;

2. If the screenshot is successful, you will hear a camera shutter sound and see a white screen for a second. To email the picture, go into your Photo app, select the image you want to send and while viewing it, touch the icon in the lower left corner of the screen (white box with a curved arrow). You can also select a number of images in the last step – simply tap on the ones you need to email prior to clicking on the Mail icon;

3. Choose the Mail option, enter the email address, subject and text if needed and press Send;

All done!
1. The process of taking a screenshot on an Android phone or tablet is quite similar to the iOS – the only difference is the location of the buttons. If you use an Android device, you need to simultaneously push the POWER and VOLUME DOWN keys, as shown on the image below, until you see a shot being taken and/or hear a shutter click;

2. Go into the Gallery, then the Screenshots folder and click on 3 little squares on top of each other in the top right corner, then choose the Select item option which will let you select as many images as you need to email.
3. Once that is done, click on the little icon that looks like 3 connected dots (see the picture below) in the top right corner of your screen and select Email or Gmail from the menu;

4. This is an example of what your screen will look like once you go into your Gmail account on the device;

The images you have previously selected will automatically appear in the Compose Email field. Simply enter the subject line and the text and click on the Arrow symbol in the top right corner to send the email.
All done!
Do you need help?
For the fastest response, please use the ‘live chat’ facility in the bottom right corner of the screen. Alternatively, please email hello@maranello.nz, phone 0800 227 484.